Quantcast
Channel: Creative Workshops from Hetti
Viewing all 137 articles
Browse latest View live

SAL Delfts Blauwe Tegels, Deel 8 - SAL Delft Blue Tiles, Part 8.

$
0
0
Allereerst wil ik jullie hartelijk bedanken voor alle leuke reacties die ik gehad heb over de Delfts Blauwe Tegeltjes. Ik ben er echt heel blij mee!

Het is zo leuk om te zien hoe creatief de patroontjes gebruikt worden.
Onder deel 8 staan foto's van de tegeltjes in andere kleuren en ook de leuke hebbedingetjes die gemaakt zijn.
Deze cupcake is gemaakt door Marion! Leuk he :-)))


First I liketo thank you so much  forthenice comments I've hadaboutthe Delft BlueTiles.I'mreally happy!

It's sonice to seehow creativethe designs are used. Below Part 8are pictures ofthe tiles indifferent coloursand thegoodiesthat are made by you.
This cupcake is made by Marion! It's so cute :-)))

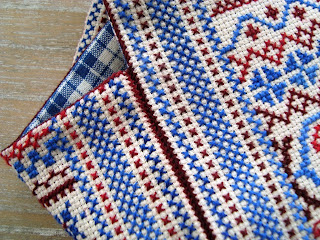
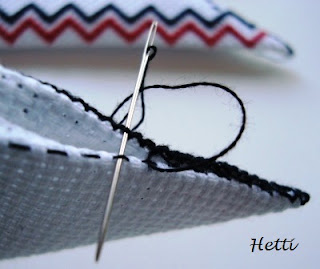
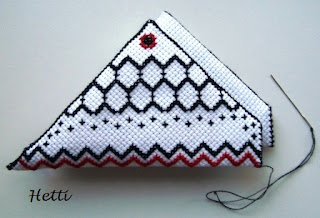
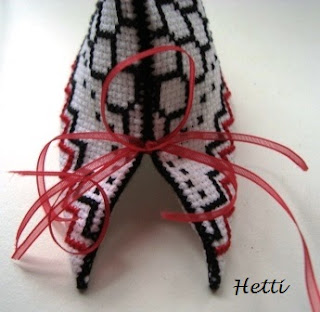
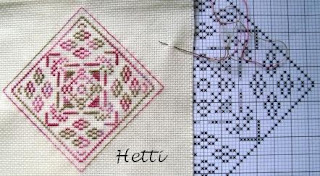
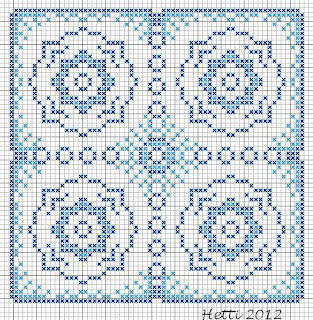
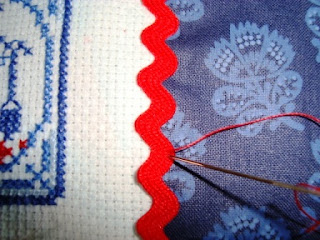
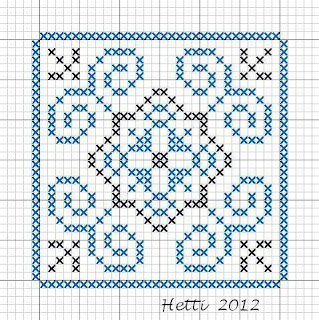
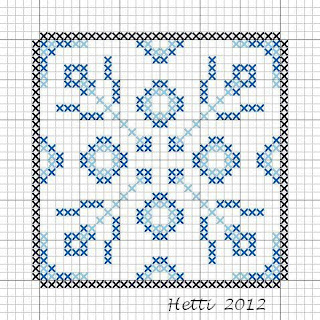
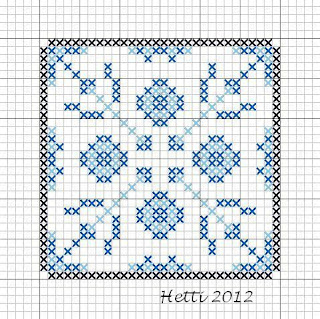
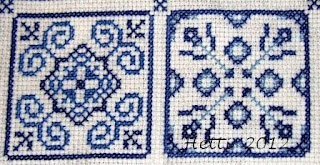
Deel 8 bestaat uit twee patroontjes die je soms langs de randen en in de hoeken van Delfts blauwe tegels ziet. Nu is het een ontwerp geworden voor de rand van de tegel sampler.

Part 8 excist oftwo patternsyou sometimes see along the edgesand in the cornersofDelft blue tiles. Now it'sbecome one patternforthe edge of the Tile sampler.


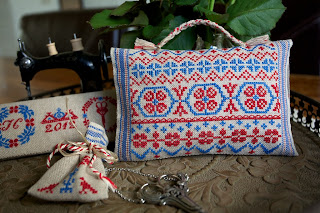
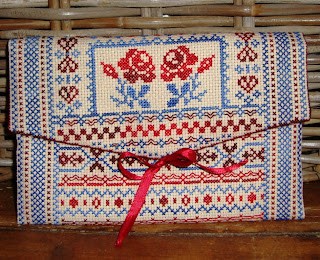
Graag wil ik de mooie Tegels laten zien die door creatieve borduursters gemaakt! Dank jullie wel ;-))))

Please I like to share with you the beautiful Tiles made by such a creative cross stitchers! Thank you so much ;-))))


Dit prachtige kleuren palet met bruin tinten is van Annette-California.

This beautiful colour palette with a touch of brown is from Annette-California.


En deze verrassende kleurencombinatie met geel is van Rian.

This surprising colour combination with some yellow is from Rian.


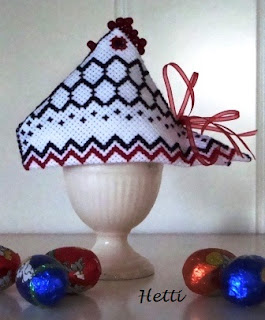
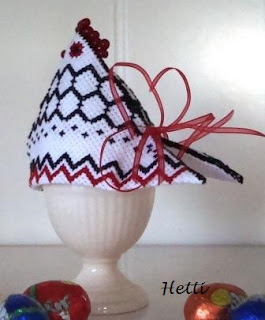
Olga maakte een Berlingot van de April Tegel, ook een leuk patroontje om te maken in plaats van een Humbug.

Olga she have made a Berlingot from the April Tile, it's also a  nice pattern to make instead of a Humbug.


En deze leuke cupcakes zijn van Marion. Ze heeft er een speciaal recept voor gebruikt want je wordt er niet dik van ;-)))

These cute cupcakes came from Marion. She has a special recipe; you may stay slim ;-)))

Veel plezier, Enjoy,

Hetti ;-))


Update SAL Delfts Blauwe tegels Deel 8, Update SAL Delfts Blue Tiles Part 8!

$
0
0
Als een zomers kadootje heb ik deze maand nog een  klein patroontje ontworpen, het is een variatie op deel 8 van de Delfts blauwe tegels.
Ook heb ik er een "foto workshopje" aan toegevoegd om er een schaar hangertje te maken.

As a Summer gift to you I have designed a little pattern,  it's a variation on Part 8 of the Delft Blue Tiles.
I alsoaddeda little "picture workshop" to made a Scissorsfob from this design.


Voor dit patroon heb ik het gevarieerde borduurgaren van ThreadworX  kleur 11011  Hydrangea gebruikt.

For this pattern I have used the variegated embroidery floss from ThreadworX colour 11011 Hydrangea.


Borduur het patroon en maak een extra rand met stiksteekjes rondom, zie foto.

Embroiderthe patternand make anextra edgewithbackstitchesaround,see photo.


Vouw op de stiksteek randen de naad naar binnen.
Vouw het borduurwerk dubbel met de goede kant naar buiten en naai de zijkanten dicht op de naad,  klik hier met een overhands steekje.

Foldtheedges on the backstitchseaminside.
Folditin half with theembroideryright side outandsew the sides on the seam, clickhere.


Naai een klein schaartje of een ander bedeltje aan de onderkant in het midden vast.

Sew asmall scissorsor anothercharmto the bottomin the middle.


Vouw het borduurwerkje weer dubbel; zie foto en naai de eerste helft dicht, zie ook de foto beneden.

Fold theembroideryagaintwice, seepictureandsew thefirst halfclosed,see picturebelow.


Neem een lintje, vouw het dubbel en maak er aan het einde een knoop in.
Schuif de knoop naar binnen in het midden en steek er twee keer met het borduurgaren doorheen om het vast te zetten aan de rand.
Naai dan de tweede helft bijna dicht, laat een vul opening open.

Takea ribbon,fold it in halfand makea knot inthe end.
Push the knotinwardsin the middle andinserttwice withthe embroidery threadthroughtosecure it tothe edge.
Then sew thesecond halfalmost closed, leave afillholeopen.


Vul de fob met fiberfil of rijst of lavendel en naai verder dicht.
Bevestig het lintje aan een mooi schaartje.

Fillthefobwithfiberfilorrice orlavenderandcontinue sewing.
Attachthe ribbontoa embroideryscissors.


Veel plezier met het schaar hangertje of scissors fob!

Have fun with the Scissors fob!

Veel plezier, Enjoy,
Hetti ;-))

SAL Delfts Blauwe Tegels, Deel 9 - SAL Delft Blue Tiles, Part 9.

$
0
0
Het negende delfts blauwe tegeltje past goed in de rand van de sampler.
Maar door in het midden een mooi bedeltje, kraaltjes of een leuk knoopje te plaatsen wordt het een heel ander patroontje ;-))

The ninth Delft Bluetilefitsinto the edge ofthe sampler.
But when you fix inthemiddle of the pattern a beautiful charm or treasure,beadsor a cute button it becomes avery differentpattern ;-))


De lay out van de Sampler  met 16 tegels.

The layout of the Sampler with 16 tiles.


Borduur de middelste kruissteekjes niet maar plaats er iets leuks!

Don't stitch the middle cross stitches and place a cute charm in the middle!


Veel plezier, Enjoy,

Hetti ;-))

SAL Delfts Blauwe Tegels, Deel 10 - SAL Delft Blue Tiles, Part 10.

$
0
0
Mijn Avatar, het Hollandse melkmeisje, is inmiddels wel bekend. Maar waar het vandaan komt niet. Deze afbeelding is van een Amerikaans echtpaar van Nederlandse afkomst die veel hollandse borduur patronen maakten voor de borduurmachine. Helaas ben ik hun site kwijt na een computercrash ;-((

Het melkmeisje staat ook op een antieke onderzetter en Hier kun je  meer lezen over het beroep van het melkmeisje........

Deze maand heb ik 2 melkmeisjes ontworpen en heb in het patroon Franse knoopjes gebruikt. Deze kunnen ook vervangen worden door kleine kruissteekjes.

My Avatar,theDutchmilkmaid,is nowknown by the most of you.Butwhere it's come from not.This image isfroman American coupleofDutch originthat manyDutchembroiderypatternsmade​​fortheembroidery machine.Unfortunately Ilosttheir siteaftera computer crash;-((

The milkmaidisalsoan image on a antique coaster andHereyou can read moreaboutthe profession ofthemilkmaid. You have to translate because the english version of Wikipedia shows a other message.

This monthI have designed  twomilkmaidsand usedFrenchknots in the pattern.These canalso be replaced by little cross stitches.


De layout voor 16 tegels.
The layout for 16 tiles.


Dit is het Melkmeisje met het dubieuze beroep...;-)))
This is the Milkmaid with the dubious occupation....';-)))


Veel plezier, Enjoy,

Hetti ;-))

SAL Delfts Blauwe Tegels, Workshop Speldenkussen - SAL Delft Blue Tiles, Tutorial Pincushion

$
0
0
                                                              
 Om het patroontje van deze maand te gebruiken heb ik een workshop voor een speldenkussentje gemaakt. Leuk kadootje voor de aankomende feestdagen ;-))

To use the pattern of this month I have made a tutorial for a pincushion. A nice gift or the coming holidays ;-))

Benodigdheden;
* het  geborduurde patroontje van het melkmeisje
* 2 stukjes bijpassende stof, zie foto
* stukje zigzagband in bijpassende kleur
* naaigerei en bijpassend garen
* vulmateriaal zoals pandavulling of fiberfill
Advies; lees de beschrijving eerst door en kijk goed naar de foto’s om de uitleg te begrijpen.

Supplies;
* the crossstich pattern of the Milkmaid
* 2 pieces of matching fabric, see photo
* a piece of ricrac ribbon in a matching colour
* sewing supplies and matching sewing thread
* filler material like Fiberfil
Advice; Please read first the description and take a close look at the pictures to understand the explanation.


Leg op het donkere stukje stof het geborduurde patroontje met de goede kanten op elkaar en naai de linker zijkant aan elkaar, zie foto.

Lay down the milkmaid pattern on the dark fabric, right sides together and sew with a backstitch the left sides together, see photo.


Vouw open en strijk de naad plat. Leg het stukje zigzagband op de naad en naai het met kleine steekjes vast tot 1 cm boven de ondernaad, zie foto. Vouw het terug en zet het tijdelijk met een paar steekjes vast. Zie foto.

Fold open the fabric iron the seam flat. Lay down the piece of ricrac ribbon on the seam and sew it with a little stitch on the seam until ½ inch from the seam line below. Fold the ricrac back and stitch it temporarily on the fabric, see photo.


Leg het nu op het grote stuk stof, goede kanten op elkaar en naai het rondom bijna dicht, laat een stukje  van 4 cm open om te keren. Begin naast de opening met een paar steekjes op elkaar en eindig ook meteen paar steekjes op elkaar.
 
Lay down the piece on the large fabric, right sides together.
Sew with small backstitches a seam around the fabric. Leave a opening about 1 ½ inch or 4 cm on the bottom for turning. Beginning at the bottom next to the opening with 3 backstitches on each other and end with also 3 stitches.


Keer het kussentje heel voorzichtig naar buiten, trek niet aan de zigzagband! Haal de draad uit het opgevouwen stukje zigzagband en laat het hangen.
Vul het kussentje met opvul materiaal, goed in de hoekjes en naai het open stukje met een klein steekje dicht.

Naai een schaartje of een ander bedeltje aan het zigzagbandje, steek er ’n paar mooie spelden in en klaar is het speldenkussentje!

Turn very carefully the pincushion right side out. Take care! Don’t pull at the ricrac ribbon! Remove the thread from the ricrac ribbon. Fill the cushion with filler material and close the opening with a little running stitch.

Sew a scissor or a other charm to the ricrac ribbon, prick a few fun pins and your pincushion is ready now!


Veel plezier en Succes!

Enjoy and Succes!

Hetti ;-))

SAL Delfts Blauwe Tegels, Deel 11 - SAL Delft Blue Tiles, Part 11.

$
0
0
November is eigenlijk geen tijd voor tulpjes, meer voor vallende bladeren!
Maar het past wel goed bij de motieven in de middelste 4 ronde tegels ;-))

November is not the time fortulips in the Netherlands,more for falling leaves!
But itfitswell with themotifs inthemiddle 4round tiles ;-))


De middelste motieven zijn nu compleet.

The motifs in the middle are now complete.


De lay out van de 16 tegels. Halverwege deze maand geef ik  2 tegels  voor de lege plekken 14 en 15.

The layout of the 16 tiles. On  November 15, I will give you 2 tiles for the empty places 14 and 15.


Kijk  eens wat een  leuk idee van Joze !!
Mijn complimenten Joze voor de mooie speldenkussentjes ;-))

My compliments for Joze, she made this lovely tea cup pincushions!!


Veel plezier, Enjoy,

Hetti ;-))


SAL Delfts Blauwe Tegels, Update - SAL Delft Blue Tiles, Update.

$
0
0
Voor degene die de lay out van 16 Delfts blauwe tegeltjes maken zijn hier 2 ontwerpen voor tegel nummer 14 en 15.
Natuurlijk kun je ook andere motieven gebruiken ;-))

For thosewho use the layoutof 16Delft bluetiles I have 2designs fortilenumber 14and 15.
Of course you canalsouseothermotives;-))


Of een variatie / Or a variation;


Na het borduren komt de laatste rij er zo uit te zien;
After cross stitching the tiles on the last row;


Tegel nummer 12 komt begin december en dan zie je ook het eind resultaat van de SAL!

Tile number 12 is coming beginning December and then I can show you the end result of the SAL!

Veel plezier, Enjoy,
Hetti ;-))

SAL Delfts Blauwe Tegels, Deel 12 - SAL Delft Blue Tiles, Part 12.

$
0
0
Dit is de twaalfde en laatste tegel van de Delfts blauwe tegels. Het zijn kleine winterse sneeuwklokjes.
Binnenkort zal ik de afwerking laten zien om er een klein kussentje van te maken.

This is the twelfth and last tile of the Delft Blue tiles. They are small snowdrops symbol of the winter in the Netherlands.
Soon I will show my  finishing touch, I have made a little pillow of the tiles.


En hier is de lay out van de 16 Delfts blauwe tegels.

 Tegel 13 is is Hier te vinden. Tegel 14 en 15 zijn Hier te vinden en Tegel 16 is Hier te vinden.

And here is the layout of the 16 Delft Blue tiles.

If you want to make this layout you can find Tile 13 Here, Tile 14 and 15 Here and Tile 16 Here.


Graag je vordering van de SAL laten zien?
Stuur dan je foto naar; 

Like to share your progress from the SAL?
Please send your photo to;

hettiweblog@gmail.com

Veel plezier, Enjoy,
Hetti ;-))


Article 16

$
0
0

Winter in the Netherlands!


Veel plezier, Enjoy,

Hetti ;-))

Feestdagen

$
0
0

FIJNE FEESTDAGEN!

HAPPY HOLIDAYS!

With love from Hetti ;-))

SAL 2012 en 2013! - SAL 2012 and 2013!

$
0
0
Zo aan het einde van het jaar is het wel toepasselijk om de laatste foto's  van de SAL van 2012 te laten zien en nieuwe voor de SAL van 2013!

At the end of the year it is applicable to show the last pictures of the SAL of 2012 and new  pictures for the SAL of 2013!


Van de Delfts blauwe tegels heb ik een kussentje gemaakt.Daarna en rood koordje rondom in de naad erop genaaid.

Steek met bijpassend garen vanuit de naad van het kussentje door de onderkant van het koord naar boven en steek vlak ernaast weer naar beneden door het koord heen in de stof van het kussentje. Een halve cm verder steek je door de naad van het kussentje weer naar boven en dan weer door het koord heen. In de hoeken exstra steekjes bevestigen.

Of  the Delft blue tiles I made ​​a cushion. Then I attach and red cord around the seam.

Stitch with a matching thread from the seam of the cushion through the bottom of the cord up and put next to it back down through the cord and into the ditch of the fabric of the cushion. A 1/4 inch further you cross through the seam of the fabric of the cushion  up and then up through the cord. In the corners make some exstra stitches to fix.


SAL 2013

Een voorproefje voor de SAL  "Love To Stitch" van 2013.
De nieuwe SAL start  op 2 januari 2013. Binnenkort geef ik alle informatie.

A preview of the SAL "Love To Stitch" of  2013.
The new SAL  start on January 2 2013. Soon I give any information.


Veel plezier met de jaarwisseling!
Enjoy the turn of the year!
Hetti ;-))

SAL 2013 Delft Blue LOVE TO STITCH

$
0
0

Gelukkig Nieuwjaar!!
Om dit jaar goed te beginnen heb ik een nieuwe Delfts Blauwe SAL ontworpen in 12 delen.
Op de 1e dag  van de maand komt er een nieuw deel uit en aan het eind van het jaar heb je een mooie sampler Love To Stitch!

 Happy New Year!!
To give this year a good start, I have designed a new Delft Blue SAL  in 12 parts.
On the 1st day of the month, a new part appear and at the end of the year you will have a nice sampler Love To Stitch!


SAL DELFT BLUE   "LOVE TO STITCH"

Patroon 128 x 128 kruissteken
Afmeting geborduurd op Aida stof 16 count / 6 hokjes per cm. is 21,5 cm x 21,5 cm.

Kleuren;
DMC  519 lichtblauw
DMC  825 medium blauw
DMC  803 donkerblauw


Variatie; zelf heb ik de kleur DMC 803 donkerblauw vervangen voor kleur DMC 841 lichtbruin.
Of gebruik je eigen lievelingskleuren en borduurstof voor deze SAL!


SAL DELFT BLUE   "LOVE TO STITCH"

Design size 128 x 128 cross stitches
Finished size on Aida 16 count is 8 1/2 inch x 8 1/2 inch / 21,5 cm  x 21,5 cm.

Colours;
DMC  519 light blue
DMC  825 medium blue
DMC  803 dark blue

Variation; I have change the dark blue colour DMC 803 into DMC 841 light brown.
Or use your own favorite colours and embroidery fabric for this SAL!!


DEEL 1 /  PART 1


De grijze kruissteken zijn de overlappende steken voor het volgende deel. Aub niet borduren!
The grey cross stitches are the overlapping  for the next part. Please do not embroider!


Mijn zus Miek gebruikt haar eigen geverfde stof voor deze SAL.
My sister Miek used her own hand dyed fabric  for this SAL.


Graag je vordering van de SAL laten zien?
Stuur dan je foto naar;

Like to share your progress from the SAL?
Please send your photo to;

hettiweblog@gmail.com

De Layout voor de 12 delen.
The Layout of the 12 parts.


Veel plezier, Enjoy,
Hetti ;-))

SAL 2013 Delft Red LOVE TO STITCH

$
0
0


Deze rode SAL Love To Stitch is een variant op de Blauwe SAL ,
Op de 15e van elke maand komt er een nieuw deel uit.
Let op; dit patroon is iets anders dan de SAL Delft Blue  Love To Stitch!

This Red SAL Love To Stitch in 12 parts is a variation of the Blue SAL.
On the 15e of each month there will be a new part of the SAL.
Attention please;  this design is a little bit different from the SAL Delft Blue Love To Stitch!


Patroon  128 x 128 kruissteken.
Afmeting geborduurd op licht bruin Belfast linnen 32 count / 6 kruissteekjes per cm is 21,5 cm x 21,5 cm.

Kleuren;
1 Valdani overdyed Color M43 Vibrant Reds  of  DMC 4210  Color Variations
2 DMC;  Blanc
Of gebruik je eigen lievelingskleuren voor deze SAL!

Design size 128 x 128 cross stitches.
Finished size on light brown Belfast Linen 32 count  is 8,5 inch x 8,5 inch / 21,5 cm x 21,5 cm.

Colours;
1 Valdani overdyed Color M43 Vibrant Reds  of  DMC 4210  Color Variations
2 DMC;  Blanc
Or use our own favorite colours for this SAL.

Deel 1 / Part 1


De grijze kruissteken zijn de overlappende steken voor het volgende deel. Aub niet borduren!
The grey cross stitches are the overlapping for the next part. Please do not embroider!


Dit is het eerste deel van .Marion
This is the first part of Marion


De Layout voor de 12 delen.
The Layout of the 12 parts.


Graag je vordering van de SAL laten zien?
Stuur dan je foto naar; 

Like to share your progress from the SAL?
Please send your photo to;

hettiweblog@gmail.com

Veel plezier, Enjoy,
Hetti  ;-))

Het mooie tasje van Jeanny!

$
0
0
Op de mooie en informatieve blog van  Jeanny's Merklapperie en nog veel meer!  staat zo'n leuk tasje waarvan iedere vrijdag een stukje patroon wordt gegeven.  Het is een mooi patroon in 6 delen en het borduurt lekker weg ;-))

Jeanny of the blog Jeanny's Merklapperie en nog veel meer! has designed such a lovely little bag.
It's a pattern in 6 parts on each friday and start on friday 4 january. Please take a look at her informative blog about Samplers ( Merklappen) and all kinds of embroidery and knitting. 


Inmiddels ben ik aan het derde deel begonnen en ik gebruik er geen band voor maar bruin Aida. Dat gaat ook prima!

Jeanny used special linen embroidery tape, but I am making it on brown Aida. The pattern is suitable for evenweave or linen.


Dank je wel Jeanny, het is heerlijk om met dit winterse weer er aan te werken ;-))

Groetjes, Hetti ;-))


SAL Delft Blue Love To Stitch Part 2

$
0
0
Allereerst wil ik jullie graag bedanken voor de spontane, aardige en leuke reacties! Ik ben er heel blij mee en stimuleert me zeker bij het ontwerpen!
Hier is deel 2 van de Blauwe SAL, hij komt aan de rechterkant van deel 1. Kijk even op het voorbeeld raster.
In de centimeter heb ik mandjes (voor de borduurspulletjes) geplaatst met ABCD ertussen.

First, I liketo thank you forthe spontaneous, kind and verynice comments! Iamvery happyand it encourages meto design!
Hereis part 2 ofthe BlueSAL, it comesto the right ofpart 1. Please take a look on the model grid.
In the ruler, I placedbaskets (for your embroidery notions) with ABCD inbetween.


De grijze kruissteken zijn de overlappende steken van het eerste deel. Aub niet borduren!
The grey cross stitches are the overlapping from the first part. Please do not embroider!


Deel 1 en 2 samen.
Part 1 and 2 togheter.


Mijn zus Miek was zoooo snel met borduren, ze heeft mijn eerste voorbeeld met cijfers geborduurd.
Later heb ik letters voor de afwisseling van het patroon in het tweede deel gemaakt ;-))

MysisterMiekwas soooofastwith part 2, she embroiderd myfirst examplewith numbers.
Later on I changes the numbers in characters forthe variation in part 2 ;-))

Graag je vordering van de SAL laten zien?
Stuur dan je foto naar; hettiweblog@gmail.com

Like to share your progress from the SAL?
Please send your photo to; hettiweblog@gmail.com

Veel plezier, Enjoy,
Hetti ;-))

Valentine

$
0
0
Voor alle bekende en onbekende bloglezers.....  I LOVE YOU!

Forall knownand unknownblog readers....... I LOVE YOU!


Belfast Vintage linnen 32count / 6 kruisjes per cm.
DMC  816 Rood en  DMC Blanc.

Belfast Vintage Linen  32 count/ 6 stitches cm.
DMC  816 Red and  DMC Blanc.


Belfast Vintage linnen 32count / 6 kruisjes per cm.
DMC  309- Rood, DMC 813- Blauw, DMC Blanc.

Belfast Vintage Linen  32 count/ 6 stitches cm.
DMC  309 - Red, DMC 813 - Blue,  DMC Blanc.


Het idee van het patroon op het garenkaartje komt van het leuke band wat ik gekocht heb bij 
Naald en Draad voor de Kerst. 
Het rood/witte band als strik is verkrijgbaar bij  Dille en Kamille.

The ideaof the patternon the Yarncardcomes from the cute ribbon thatI boughtat the Dutch craft and embroidery shop Naald en Draad  for Christmas.


Veel plezier, Enjoy,
Hetti ;-))

SAL 2013 Delft Red LOVE TO STITCH Part 2

$
0
0
Dank jullie wel voor de geweldige leuke reacties en deelname aan deze rode SAL.

Deel 2 heeft nog wat van Valentijn door het geborduurde hartje in het middelste klosje ;-))
En de meetlat bovenaan heeft in dit deel een verandering ondergaan met 2 mandjes (voor de borduurspulletjes) en de letters ABCD.
Dit deel komt aan de rechterkant van deel 1, kijk even op het voorbeeld raster onder.

Thank you so much  for your very nice commentsand participation inthis redSAL.

In Part 2 there is some  Valentine  in themiddlespool ;-))
This part  comesto the right ofpart 1. Please take a look on the model grid.
In the ruler, I placedbaskets (for your embroidery notions) with ABCD inbetween.


De grijze kruissteken zijn de overlappende steken van het eerste deel. Aub niet borduren!
The grey cross stitches are the overlapping from the first part. Please do not embroider!


Deel 1 en 2 samen.
Part 1 and 2 togheter.


Meer foto's zien? Kijk dan Hier bij Flickr.
More pictures? Please look Here on Flickr.

Graag je vordering van de SAL laten zien?
Stuur dan je foto naar; hettiweblog@gmail.com

Like to share your progress from the SAL?
Please send your photo to; hettiweblog@gmail.com

Veel plezier, Enjoy,
Hetti ;-))

Tasje van Jeanny

$
0
0
Het leuke tasje van Jeanny is klaar!
Kijk op haar mooie blog voor het patroon en foto's van andere tasjes.

The beautiful bag of Jeanny is ready!
Please take a look on her blog for the pattern and photos of other bags.


Wel heb ik een kleine verandering aangebracht in het patroon door er een envelop tasje van te maken.

I have made a little change in the pattern because I wanted a envelop bag.


Nadat het borduurwerk klaar was heb ik  bijpassend stofje gebruikt voor de binnenkant.
Heb je dat nog nooit gedaan klik dan Hier voor de werkwijze.  

After I have finished the embroidery a matching fabric I have used for the inside.
If you never have done this before, clic Here for the method.


Door een knoop in beide lintjes te maken trek je ze, voordat je de opening sluit van het tasje, met een dikke borduurnaald door de binnenkant naar de buitenkant van stof heen.

Make aknot in eachribbontopullthemwitha thickneedlethrough the inside fabric to the outside, before  closing the opening in the bag. 


De zijkanten heb ik gesloten op de "Biscornus methode" klik HIER  voor de beschrijving. Het is Frans maar de foto's laten het goed zien.

The both sidesI have closed with the "Biscornusmethod" click HERE for  the technique. It is French but the photos will show you it very well.

Dank je wel Jeanny voor het mooie patroon en tasje!
Thank you so much Jeanny for the beautiful design and bag!

Veel plezier, Enjoy,
Hetti ;-))

SAL Delft Blue Love To Stitch Part 3

$
0
0
Dit is het derde deel van de Delfts Blauwe SAL.
Het komt naast deel 2, kijk aub even op het raster van de 12 delen, beneden.

This is the third part of the Delft blue SAL.
This part comesto the right ofpart 2. Please take a look on the model grid of the 12 parts, see below.


De grijze kruissteken zijn de overlappende steken van het tweede deel. Aub niet borduren!
The grey cross stitches are the overlapping from the second part. Please do not embroider!


Deel 1, 2 en 3 samen.
Part 1,2 and 3 together.


En van mijn zus Miek.
And from my sister Miek.

Dank jullie wel voor de foto's van jullie vorderingen!!
Thank you so much for the  photos from your updates!!

Wil je deze foto's zien? Kijk dan Hier bij Flickr. Of op de zijbalk op de foto.
Like you see this pictures? Please look Here on Flickr. Oron the sidebaron the photo.

Graag je vordering van de SAL laten zien?
Stuur dan je foto naar; hettiweblog@gmail.com

Like to share your progress from the SAL?
Please send your photo to; hettiweblog@gmail.com

Veel plezier met borduren, Enjoy the stitching,
Hetti ;-))

Workshop Kip Eiwarmer, Chicken Egg Warmer

$
0
0
Geborduurde en zelfgemaakte Eiwarmers voor op de Paastafel of gewoon om je eitje warm te houden ;-))

Embroideredandhomemade EggwarmersfortheEastertableor just to keep your eggs warm ;-))


WORKSHOP

Borduur  met kruissteken op witte Aida stof, 5.5 hokje per cm, of witte aftelbare stof,  11 draadjes per cm,  het patroon rechts 1x en het patroon links 1x van de kip.
DMC  310 Zwart
DMC  321 Rood

Embroider with cross stitches on white Aida fabric 14 count, or white Evenweave fabric 28 count the pattern right 1x and the pattern left 1x of the chicken.
DMC 310 Black
DMC  321 Red


Vouw het patroon diagonaal om en knip de zijkant af, zie foto beneden.
Foldthe patterndiagonallyand cut the side off, see picturebelow.


Vouw de zoompjes naar binnen op de geborduurde randen en naai ze dicht met 1 draad DMC zwart, zie foto beneden.
Fold the hems to the inside on the embroidered edge and sew them together with 1 thread of DMC black, see picture below.


Leg de kippen op elkaar met de goede kanten naar buiten, zie foto beneden.
Place the chickentogetherwiththeright sides out, see picture below.


Naai de beide helften aan elkaar; begin in het midden beneden en naai tot de derde zigzagrand. Het laatste stukje blijft open als staartje! Zie beneden.
Sewthe twohalves together, beginningin the middleand sewdownto the third rickrack edge. The last pieceremains openastail! See below.


Gebruik voor de bek en kam rode kralen van  4,5 mm doorsnede en zet ze met DMC  321 rood, aan de zijkant en bovenkant van de kop vast.
Forthe beakandcomb use redbeadsof 4.5mm diameterandsecure withDMC321 Red,on the sideand top ofthe head.


Gebruik als veren aan de staart rood lint, steek met een dikke naald ongelijke stukjes lint door de splitsing van de staart en zet er een knoop in. Kijk op de detail foto boven.
Use asfeathers on thetailredribbon, inserta thickneedleunevenpieces of ribbonthrough thejunctionof the tailand puta knot in it. Lookatthe detailpicture above.


Binnenkort komt er een echt Paas patroontje voor de eierwarmer ;-))
Soon there will bea real Easter patternfor the egg warmer ;-))

Veel plezier met borduren en het maken van het Kippetje!
 Enjoy the stitching and making the Chicken!

Hetti ;-))

Viewing all 137 articles
Browse latest View live